- 1 INTRODUCTION
- 2 MANUFACTURER AND PRODUCT INFORMATION
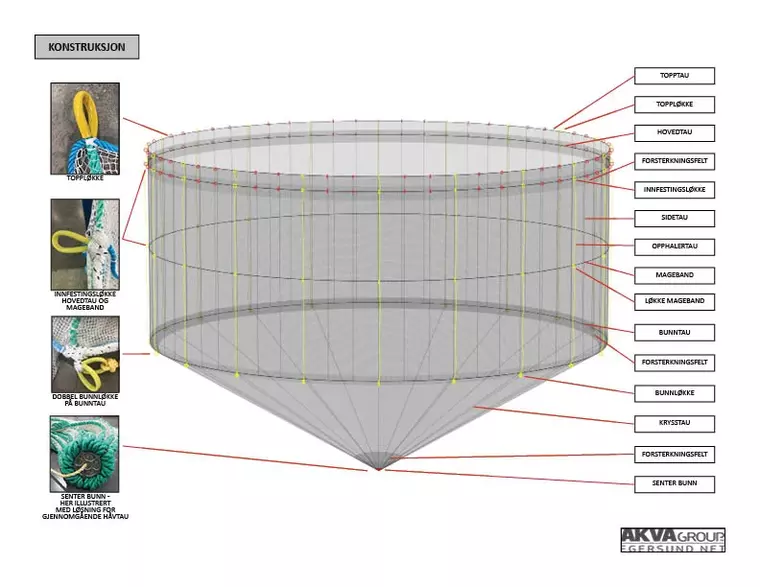
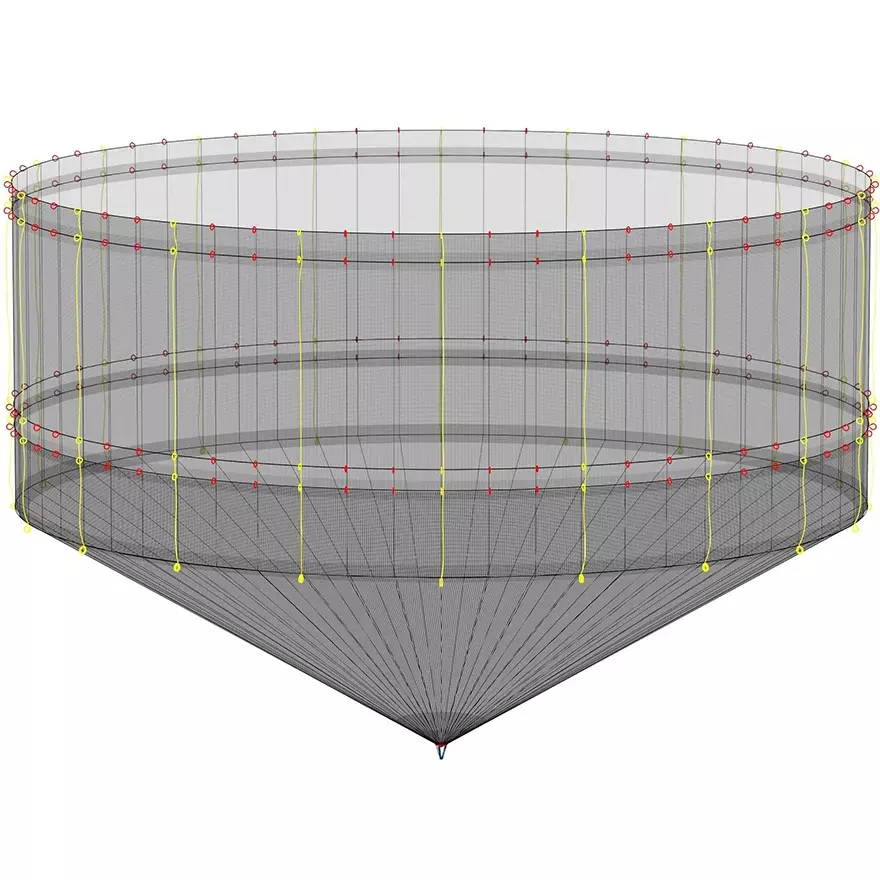
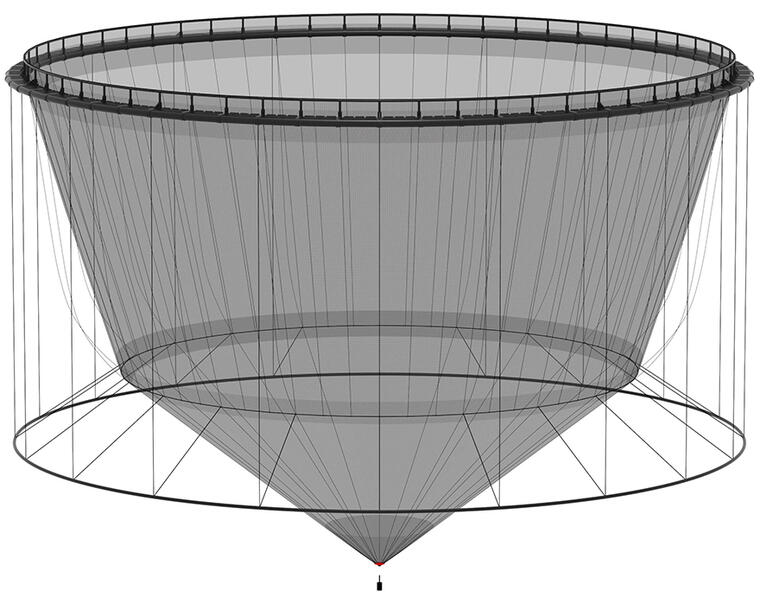
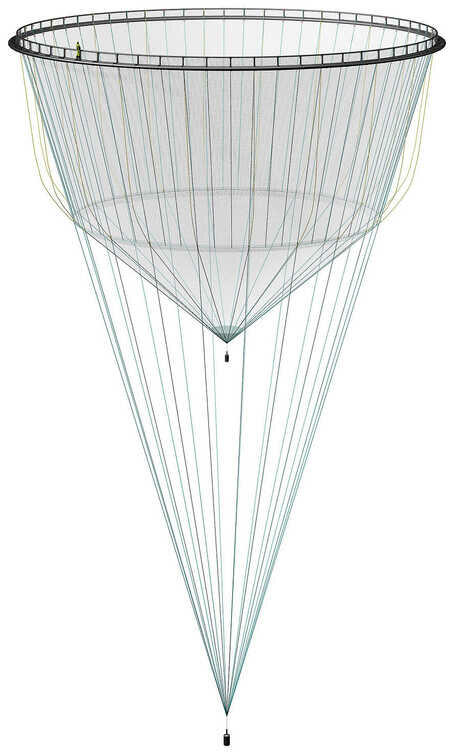
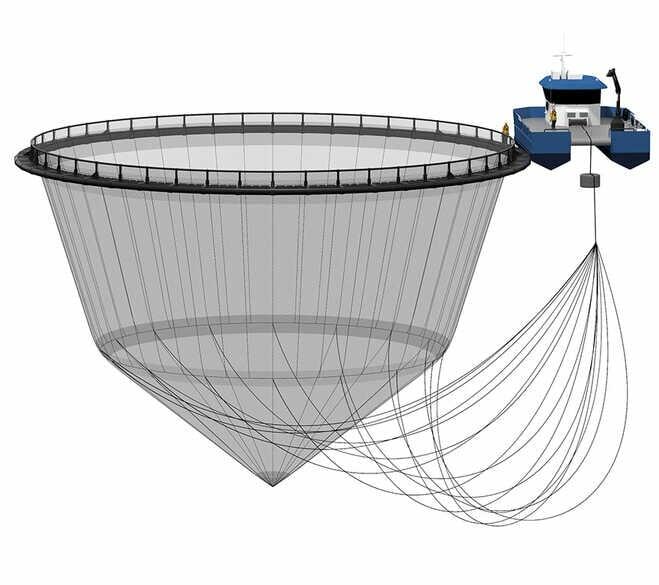
- 3 THE NET AND ITS COMPONENTS
- 4 TRANSPORTATION AND STORAGE
- 5 INSTALLATION
- 6 INTERFACES WITH ADDITIONAL EQUIPMENT AND OTHER COMPONENTS
- 6.1 Attaching the net to the pen
- 6.2 Installation and handling of stretching system
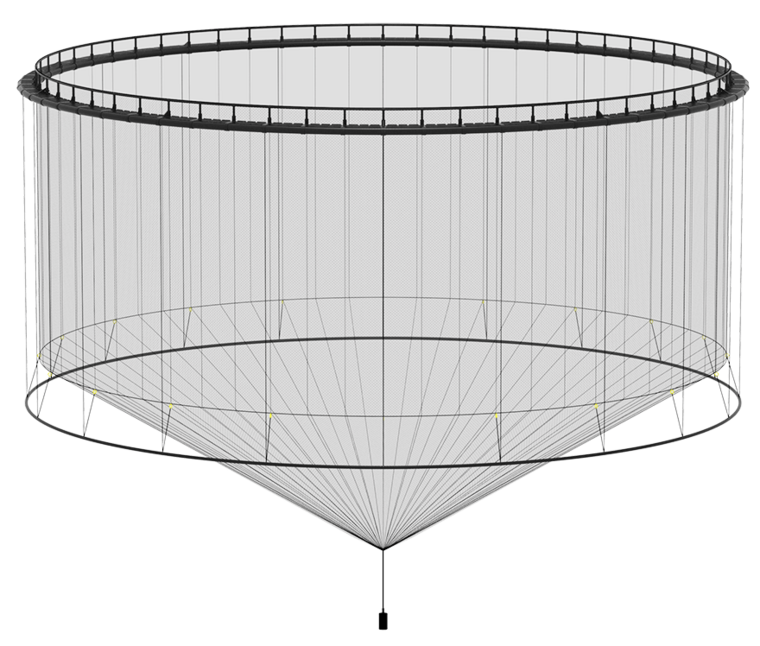
- 6.2.1. Sinkertube or single weights in bottom loops
- 6.2.2 Attaching sliding weights
- 6.2.3 Centre weight
- 6.3 Installation and handling of dead fish collection system
- 6.4 Additional equipment
- 6.4.1 Passing components through the netting
- 7 OPERATION
- 7.1 Approach by boat
- 7.2 Cleaning nets at sea
- 7.3 Handling the net when performing operations
- 7.4 Use of bead line/ball line
- 7.5 Change a net
- 7.6 Remove net from pen
- 7.7 Special environmental conditions
- 7.7.1 Current conditions
- 7.7.2 Extreme weather
- 7.7.3 Ice in winter
- 7.8 Risk assessment - critical points
- 8 MAINTENANCE/SERVICE
Introduction
1.1 Organisation of the user manual for nets
The user manual for nets produced by Egersund Net comprises a general section as well as user instructions specific to each net design.
The user manual contains the following main headings, in accordance with the requirements outlined in NS 9415 and the NYTEK regulations:
- Informtion about the manufacturer and product identification
- The nets and its components
- Transportation and storage of a net
- Installing the net
- Interfaces with other main components
- Operation
- Maintenance
1.2 Revision changes
Here are the most important updates to revision 8 of February 2022:
| REV.NO | DATE | SCOPE | REFERENCE |
|---|---|---|---|
| 8 | 01.02.2022 | New service facility added - Kvalsund | 2.1 |
| 8 | 01.02.2022 | New type of bottom loop | 3.2 |
| 8 | 01.02.2022 | ENCA nets - updated information | 3.3 |
| 8 | 01.02.2022 | Pests | 4.3 |
| 8 | 01.02.2022 | Information about placement of sinkertube | 6.2.1 |
| 8 | 01.02.2022 | Information about sliding weights | 6.2.2 |
| 8 | 01.02.2022 | new information about cleaning nets at sea | 7.2 |
| 8 | 01.02.2022 | Information about washing time for used nets in a service facility | 8.4 |
1.3 Symbol definitions
This symbol is placed next to text describing requirements.
 This symbol is placed next to text describing potential incidents and other aspects that you shoouls be aware of.

Describes tips and advice in connection with the installation and handling of a net.
This symbol is placed next to text describing incidents and/or operations that may increase the risk of fish escaping.
Manufacturer and product information
2.1 Contact
If you have any questions about the nets, inspection or maintenance, please contact our head office or nearest service facility.
HEAD OFFICE
Egersund Net AS
Svanavågveien 30
NO-4373 Egersund
Tel: +47 51 46 29 60
E-mail: post@egersundgroup.no
www.egersundnet.no
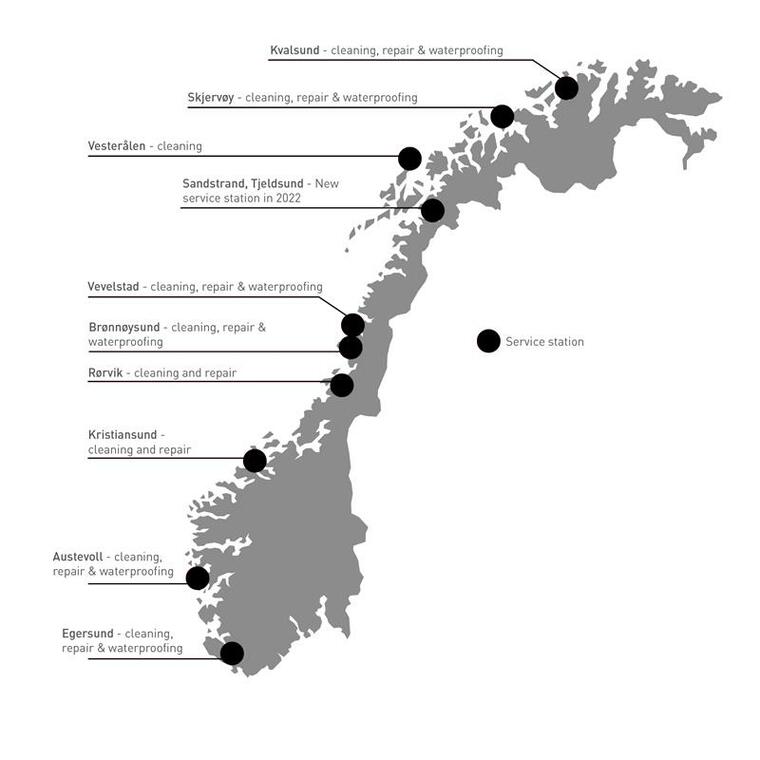
Service Facilities
Egersund Net AS,
department Egersund
Tel: +47 51 46 29 60
Egersund Net AS,
department Kristiansund
Tel: +47 51 46 29 60
Egersund Net AS,
department Brønnøysund
Tel: +47 51 46 29 60
Egersund Net AS,
department Vesterålen
Tel: +47 76 14 00 00
Egersund Net AS,
department Kvalsund
Tel: +47 99 50 59 48
Egersund Net AS,
department Austevoll
Tel: +47 55 08 85 10
Egersund Net AS,
department Rørvik
Tel: +47 51 46 29 60
Egersund Net AS,
department Vevelstad
Tel: +47 51 46 29 60
Nofi Oppdrettservice,
department Skjervøy
Tel: +47 99 50 59 48
2.2 Documentation
A net must include a product certificate containing information about the dimension class, validity period, details of the net and the material used for its construction. The user manual and any service history card must also be included. These documents must be made available for personnel to access on-site.
2.3 Identification of a net
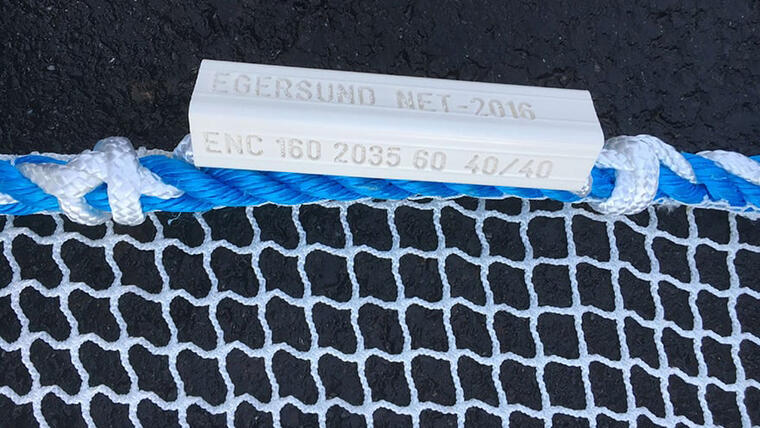
Each net has a unique production number. All production-related information and maintenance history is registered and stored with reference to the production number.
Each net has three identification tags: two attached to the top rope and one attached to the centre of the bottom. The identification tags contain the following information:
Manufacturer, year of manufacture, production number, dimension classification, the shape and size of the net, and the type of netting.
On square nets (ENS and ENR), a special tag is attached to each of the corners of the top rope.

2.4 Validity period
A net may not be used for breeding fish without valid documentation. The validity period for a new net is 24 months. The product certificate`s validity period begins when the net is placed in seawater, which must be no later than 12 months of the issue date. After 24 months, a net must have a supplemental valid service history card. A service history card can extend the net`s validity period by a maximum of 24 months, provided that the net meets the required durability and condition.
A service history card can only be issued by a certified maintenance workshop. All Egersund Net service facilities are certified as service stations in accordance with NS 9415. See NS 9415 for further requirements for the validity period and any extension of such validity.
2.5 Net-Reg
Net-Reg is a user-friendly equipment log that also covers the need for checklists and documentation and moorings. Use of this tool gives the fish farmer a complete overview of their locations and the status of their technical equioment. For both internal and external audits, the tool is used to produce installation sertificates, drawings, documentation and certificates for each individual component in the entire installation. Net-Reg is also ideal for logging. You can obtain further information about the customer portal by contacting one of our service departments.
2.6 Modifications, reconstruction and enlargement
Any modifications, reconstruction and/or enlargement of nets must be undertaken in consultation with Egersund Net. If any modifications are made that result in information in the product certification no longer being accurate, the net will need to be recertified.
Egersund Net must be contacted prior to making any approvements to the net.
2.7 Discrepancies and managing faults
If any faults or defects are discovered in the net, this must immediately be reported to our sale representative or to one of our service departments. The type of fault or defect will determine the course of action to take, whether the fault or defect is to be recified at the site, and whether the net must be returned to the nearest service facility, or the fault or defect is such that it can wait until the net is returned for routine service.
The net and its components
3.1 Definitions
| POOL DIMENSIONS | Circumference of the pen. |
|---|---|
| PROTECTIVE NET | PROTECTIVE NET |
| Extra netting attached to the outside of the centre bottom to protect against potential abrasion and predator activity. | Extra netting attached to the outside of the centre bottom to protect against potential abrasion and predator activity. |
| BOTTOM LOOP | BOTTOM LOOP |
| Attached to the bottom rope. Only bottom loops that have been fitted onto the cross rope / lifting rope can be used for lifting or expanding the net. | Attached to the bottom rope. Only bottom loops that have been fitted onto the cross rope / lifting rope can be used for lifting or expanding the net. |
| SINKERTUBE | SINKERTUBE |
| Frame that weighs down and expands the bottom of the net. Usually made of plastic and attached to the pen with the help of a chain or rope. | Frame that weighs down and expands the bottom of the net. Usually made of plastic and attached to the pen with the help of a chain or rope. |
| BOTTOM ROPE | Horizontal rope that fits between the side and the bottom of the net. |
| MENDING | Repair of holes in the net by making new mesh to replace that which has been damaged. |
| DIMENSIONING SERVICE LIFE | |
| The anticipated time period for which the net is intended to be used for fish farming, while maintaining the required maintenance but without the need for any extensive repairs. | The anticipated time period for which the net is intended to be used for fish farming, while maintaining the required maintenance but without the need for any extensive repairs. |
| DOCUMENTED COMPETENCE | |
| Written evidence of practical and theoretical skills being attained in accordance with the requirements outlined in an existing course or training plan. | Written evidence of practical and theoretical skills being attained in accordance with the requirements outlined in an existing course or training plan. |
| SIDE DEPTH | Vertical depth measured from the main rope to the bottom rope. |
| CENTRE DEPTH | Vertical depth measured from the main rope to the deepest point (centre) of an expanded/weighted net. |
| DEAD FISH COLLECTOR | Equipment for the removal of dead fish from the net. |
| PEN | Frame that provides flotation and support for the net. Usually manufactured in plastic (rings) or steel. |
| REINFORCEMENT | Areas of the net that are reinforced with double netting – typically in the centre of the bottom and in the transition between the side and bottom. In addition, the net may be reinforced at the waterline, where there is a risk of abrasion between the pen and the net. |
| VALIDITY PERIOD | The time period for which the net is approved for use, measured from when the net is put to use. |
| HALF MESH | The length of the side of a single mesh of a net, measured from the centre of one knot to the centre of the adjacent knot. See illustration in |
| section 3.4. | section 3.4. |
| WHOLE MESH/ MESH LENGTH | The distance between the centre of two opposite knots in a single mesh of a net when pulled taut. See illustration in section 3.4. |
| CORNER TAG | Tag that is attached to the top loop, in the corners of square nets. |
| JUMP NET | A section of net placed between the top rope and main rope. |
| MAIN COMPONENT | Main components include the net, moorings, pen and raft. |
| MAIN ROPE | Horizontal rope placed under the top rope, where the net is attached to the pen. |
| HS | The dimensioning significant wave height (also known as SWH), with 50-year return period (also known as recurrence interval). |
| DEAD FISH COLLECTOR ROPE | Rope for installing and lifting of the dead fish collector. |
| IDENTIFICATION TAG | Fixed identification tag with information about the production number. |
| ANTIFOULING | The use of coating helps extend the service life of the net. Coating will in general protect the netting and rope against UV rays, while copper coating will reduce growth on the netting below the waterline and make it stiffer in the sea. |
| ATTACHMENT LOOP | Attached to the main rope and used to attach the net to the pen. |
| ATTACHMENT ROPE | Rope used to attach the net to the pen. Connects to the net’s attachment loop. |
| CLAMP | Component on the plastic ring/pen which holds the rings together. |
| CONNECTION ROPE/ UMBILICAL | Rope installed between the centre exterior and interior bottom. |
| CROSS ROPE | Continuation of side rope, which alone or conjoined with other ropes crosses the bottom to the opposite side rope. |
| LIFTUP | System for collecting dead fish. |
| LIFTUP POCKET | Pocket installed at the bottom centre of the net to adjust Liftup. |
| APERTURE | Inside distance between two opposite knots in a single mesh of a net when pulled taut (same as mesh opening). |
| LIFTING ROPE | The side rope that continues as a cross rope at the bottom of the net. |
| WAIST ROPE | Horizontal rope (one or more) placed between the main rope and bottom rope. |
| MESH OPENING | |
| Inside distance between two opposite knots in a single mesh of a net when pulled taut. See illustration in section 3.4. | Inside distance between two opposite knots in a single mesh of a net when pulled taut. See illustration in section 3.4. |
| TEMPORARY REPAIR | Repair of damage to a net in use to prevent escape. |
| NETTING | Material used in nets. |
| NET | The complete bag of netting used to contain farmed fish. |
| NS 9415 | Norwegian standard of requirements for location survey, risk analysis, design, dimensioning, construction, installation and use of all primary components, and for floating fish farms in general. |
| NYTEK REGULATIONS | |
| Regulations designed to prevent fish escaping from floating aquaculture installations by ensuring responsible technical standards on site. | Regulations designed to prevent fish escaping from floating aquaculture installations by ensuring responsible technical standards on site. |
| OMFAR | The number of half meshes per cubit (1 cubit = 62.75 cm) |
| CIRCUMFERENCE | The circumference of the net measured along the main rope. |
| HANDLING ROPE | A loose rope on the outside or inside, attached to a loop at the bottom rope and continuing up along a lifting rope. |
| PRODUCTION NUMBER | A unique number that identifies the net. |
| PRODUCT CERTIFICATE | |
| Certificate verifying that the net has been manufactured in accordance with the requirements of the NYTEK Regulations and NS 9415, and that the net is approved for fish farming. | Certificate verifying that the net has been manufactured in accordance with the requirements of the NYTEK Regulations and NS 9415, and that the net is approved for fish farming. |
| CENTRE WEIGHT | Weight fitted underneath the bottom centre. |
| CENTRE WEIGHT NET/SPAGHETTI NET | Cone-shaped net, without netting from the bottom rope down to the “point”. |
| CENTRE WERIGHT ROPE/SPAGHETTI ROPE | Rope going from the bottom rope down into the “point”. |
| CENTRE RING RING | Ring at the bottom centre |
| of | of |
| the net. | the net. |
| SERVICE HISTORY CARD | Confirmation that the net has been checked and approved in accordance with the requirements of NS 9415. |
| SIDE ROPE | Vertical rope in the net. |
| SIGNIFICANT WAVE HEIGHT | The average wave height (from trough to crest) of the highest one-third of the waves measured. |
| SOLIDITY | A measure of how much of the net area is covered by netting. |
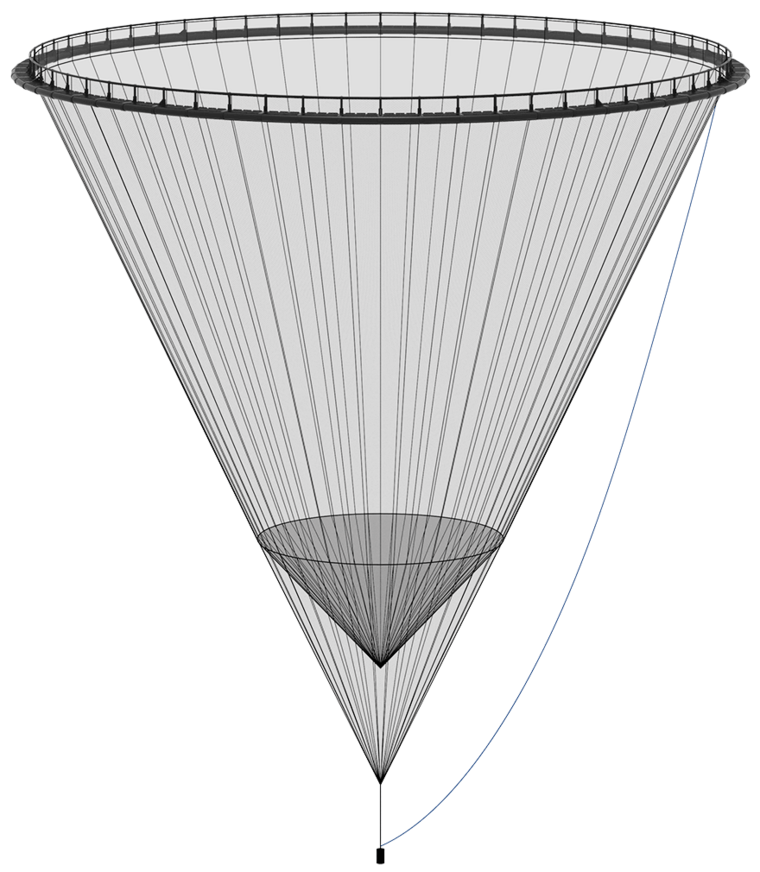
| CONED NET | Cone-shaped net with netting all the way down to the “point”. |
| CURRENT VELOCITY | The speed at which the water moves at the site. |
| TOP LOOP | Loop attached to the top rope. |
| TOP ROPE | The highest-placed horizontal rope on the net. |
| TOTAL DEPTH | For cone-shaped/centre-weight/ spaghetti nets: the vertical depth to the attachment point for the stretching system. |
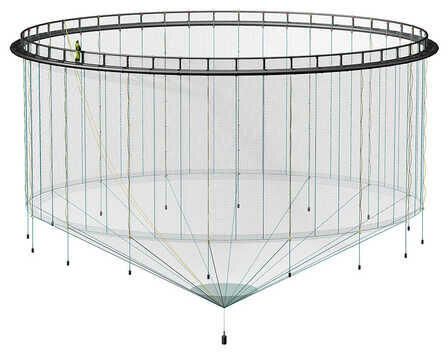
| STRETCHING SYSTEM | The use of individual weights or sinker tube(s) to maintain the desired (three-dimensional) shape and tension of the net. |
| VS | The dimensioning current velocity with 50-year return period. |
3.2 Construction
The net consists primarily of netting and ropes. The ropes create the structure and are designed to absorb the loads applied to the net. Every rope has a function and it is important to recognise that not all ropes are designed to withstand/absorb all types of loads.
3.3 Type designations
Egersund Net uses the following type designations on the various types of net structures:
ENC - Egersund Net Circle
ENC
- Straight-wall circular net
- Suitable for PE (polyethylene) pen
- Comprehensive utilisation of volume
- Can be used irrespective of the water depth and with various stretching systems, such as a sinker tube or single weigths
EXAMPLE OF TYPE DESIGNATION
ENC 160 3040 60, where: - 160 indicates circumference
- 3040 indicates depth measured from main rope to main rope and bottom centre
- 60 indicates number of side ropes
ENCL - Egersund Net Circle Lift
- ENCL - Egersund Net Circle Lift
- Suitable for PE (polyethylene) pen
- Same as the ENC, except designed for the sinkertube to be installed directly in the net, with additional waist rope and attachment point for mounting to the pen. Normally positioned approximately 5 m under the main rope.
ENCK - Egersund Net Circle Kombi
- ENCK - Egersund Net Circle Kombi.
- Suitable for PE (polyethylene) pen.
- Same as the ENC, except with netting for big fish in the top part of the side and netting for smolt in the bottom part of the net.
- Used as a combi net that you install so that the top section (big fish) is above the waterline when ponding the smolt. When the fish are large enough, you lower the rest of the net to increase the volume.
- See the user manual for combi net for more information.
This part of the illustration shows where the section of the combi net for the big fish is attached to the frame of the pen.
Combi net with suitable netting for big fish in the top section and for small fish in the bottom section..
ENCA - Egersund Net Circle Angled
ENCA with sinkertube
ENCA with centre weight ropes
- Angled circular net
- Suitable for PE (polyethylene) pen
- Comprehensive utilisation of volume
- Sinkertube or single weights can be used as stretching system
EXAMPLE TYPE DESIGNATION
ENCA 160 223252 60, where
- 160 indicates circumference
- 223252 indicates depth measures from main rope to bottom rope and to centre rope
- 60 indicates number of side ropes
ENCC - Egersund Net Circle Coned
ENCC
- Coned circular net
- Suitable for PE (polyethylene) pen
- A single weight is used for weighting/to maintain the shape
- Volume is less than ENC and is therefore often manufactured with a greater depth
- Normally requires more depth to the ocean floor than ENC
- Must have an interior bottom to ensure effecient handling of dead fish and to reduce the risk of abrasion from the dead fish collection system
EXAMPLE OF TYPE DESIGNATION
ENCC 160 354555 60, where
- 160 indicates circumference
- 354555 indicates depth measured from main rope to bottom rope, centre of interior bottom and centre of exterior bottom
- 60 indicates number of side ropes
ENS - Egersund Net Square
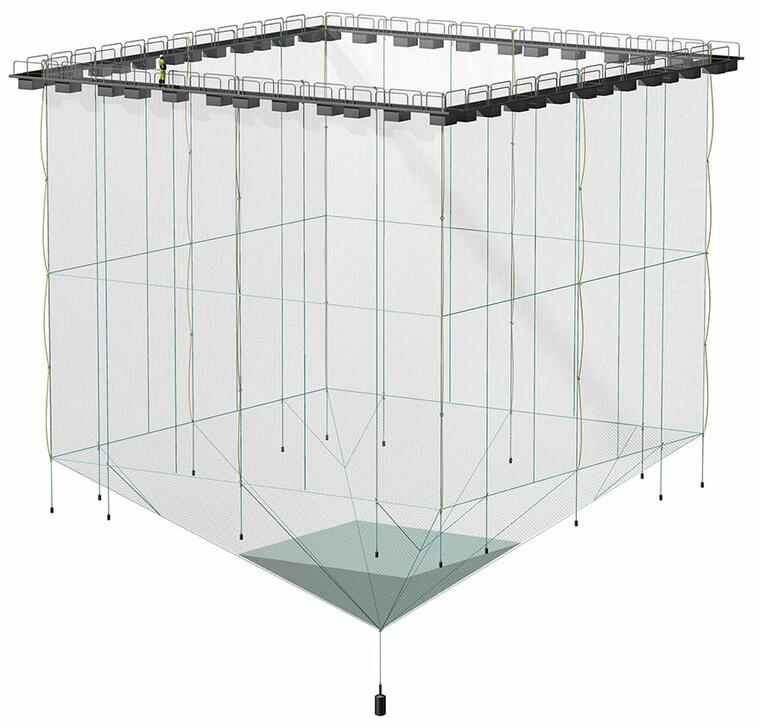
ENS
- Suitable for square steel-based installations (cages)
- Usually weighted with single weights
EXAMPLE TYPE DESIGNATION
ENS 25x25 2035 34, where
- 25x25 indicates circumference
- 2035 indicates depth measured from main rope to bottom rope and to bottom centre
- 34 indicates number of side ropes
ENR - Egersund Net Rectangular
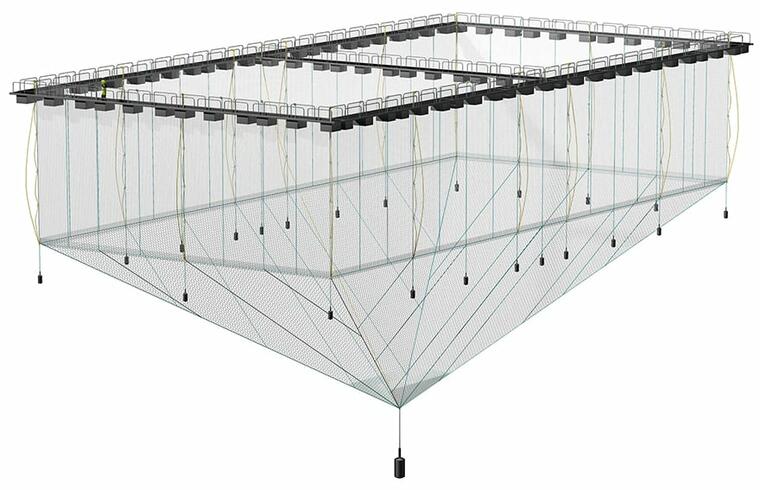
ENR
- Suitable for rectangular steel-based installations (cages)
- Usually weighted with single weights
- Often used as one net in two square steel-based installations (cages)
EXAMPLE TYPE DESIGNATION
ENR 25x53 2035 32, where
- 25x53 indicates circumference
- 2035 indicates depth measured from main rope to bottom rope and to bottom centre
- 32 indicates number of side ropes
3.4 Mesh sizes

Half mesh
Half mesh refers to the length of the side of a single mesh of a net, measured from the centre of one knot to the centre of the adjacent knot
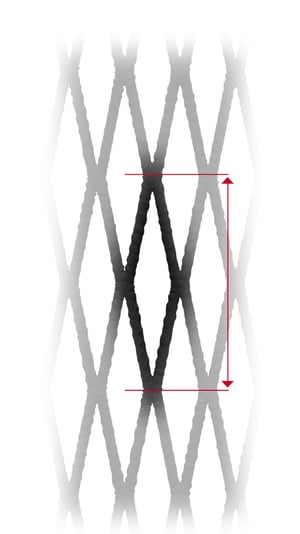
Whole mesh
Whole mesh refers to the distance between the centres of two opposite knots in a single mesh of a net when pulled out
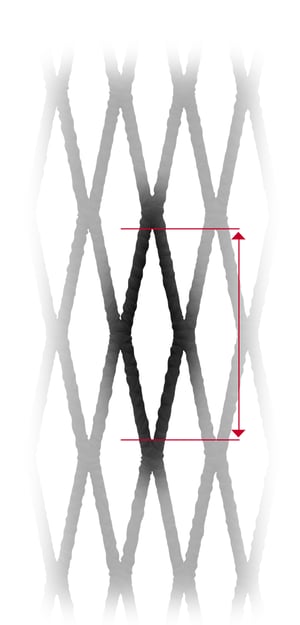
Mesh opening
Mesh opening (aperture) refers to the inside distance between two opposite knots in a single mesh of a net when pulled out
3.5 Assumptions and limitations
Nets from Egersund Net are manufactured and certified for fish farming. Our nets must not be used for any other purpose. The mesh size of the net must be appropriate for the size of fish for which is intended, and it must prevent small fish from escaping through the mesh of an intact net.
The durability of the net must satisfy the requirements of NS 9415 for the full duration of its service life. A net which no longer satisfies durablility requirements must not be used for fish farming.
There will always be potential variations in the basic dimensions used for the individual main components. In a complete system, the component designed in line with the lowest environmental requirements will dictate the approval of the entire installation.
For example, a pen may be approved to tolerate larger waves and stronger current conditions than a net.
It is important to consider how the net and other components in a complete system affect each other. A net covered in fouling will increase the load of the net, pen and moorings, and reduce the oxygen supply to the fish. The net must be designed for the pen so that it is positioned correctly in the sea. Any weights or other stretching systems used must also be designed for the net.
3.6 Load and load distribution

The biggest loads applied to the net normally occur where it attaches to the pen. It is therefore important to check these attachment points during routine and special inspections. A critical point is when installing and using the stretching system.
The load applied to nets varies greatly, depending on currents and wave conditions at the site, as well as on the stretching system used. Incorrect installation of the stretching system can cause an uneven load and lead to the net tearing. Lifting the net at high speed will also produce significant loads and potentially weaken or tear the netting. You can find information about permitted loads and weights on the product certificate.
3.7 Dimension classifications
All net designs must be approved for å given dimension classification. This is determined based on the net`s circumference and depth to centre, as well as on the dimensioning significant wave height (Hs) and dimensioning current velocity (Vs) caused by environmental loads.
3.7.1 Establishing dimension classifications
For sites with a dimensioning significant wave height below 2,5 m and a dimensioning current velocity below 0,75 m/s, the dimension classification is to be established based on the net`s circumference and the total depth, in line with NS 9415 8.6.3, table 8.
If a site has a dimensioning significant wave height in excess of 2,5 m and/or a current velocity higher than or equal to 0,75 m/s, only nets approved for dimension classification 0 may be used. The same applies if the net`s depth to centre exceeds 40 m and its circumference exceeds 169 m.
Fish farmers must be aware of the dimensioning significant wave height (Hs) and dimensioning current velocity (Vs) at their sites. if either or both environmental parameters are exceeded, the operator must ensure that the nets being used are certified in accordance with the relevant environmental loads and marked as dimension classification 0. You must make your own calculations for nets in dimention classification 0.
Requirements for the durability of netting and for the ropes attached to the nets are outlined in NS 9415, section 8.6.4, table 9 and 10.
3.8 Dead fish
A large number of dead fish at the bottom of the net can represent a risk in terms of the increased load on the net and other components. Although the net itself can tolerate a large number of dead fish, the mass of dead fish may create significant dynamic forces when the aquaculture installation moved. In extreme cases, these forces may be so great that they pose a risk of damaging the net and/or pen.
Fish farmers must monitor the quantity of dead fish regularly, and develop an emergency plan that includes measures to be taken in event or mass deaths of fish in a net.
The weight of dead fish in seawater is presumed to be approximately 5-10% of their actual weeight above the surface. This is not a scientifically documented ratio, and should ony ever be used to estimate the conditions in the net when dealing with large amounts of dead fish.
Transportation and storage
4.1 Receipt

When you receive a net, you must check the package for any damage. Visible damage to the packaging is a sign that something has happened to the net during transport. In such cases, you must inspect the net before use and notify Egersund Net and carrier.
When transporting the net, it is very important to ensure that the ropes and netting do not get caught on anything and tear. Ideally, the net should be stored in its original packaging. This makes it easier to transport and reduce the risk of damage. Always inspect the net after installing it in the pen. This requirement also applies even if the net arrives directly from a service facility.
4.2 Moving a net
If you need to move the fish farm installation with the net installed in the pen, it must be towed with great care. Any stretching system must be removed and the towing speed must not exceed the approved current velocity for the net.
4.3 Storing nets
Nets must be stored in such a manner that they are not exposed to external factors capable of causing damage to filaments, ropes or the net as a whole. The materials in the net can be easily damaged by heat, so you must never store the net near heat sources. Similarly, work involving strong heat, such as welding, must never be performed near the net.
When you receive a net, it is your responsibility to ensure that it is stored appropriately. The net must be protected against the long-term effects of strong sunlight. In most cases, the original packaging will provide sufficient protection against weather and sunlight, and make it easier to identify any external factors that the net may have been exposed to during storage. The best place to store nets long term is indoors.
All nets should be stored on a pallet. This also applies if the net is packed in a bag with loops that are certified for lifting. If a net is packed in a bag with loops, it is important to check the capacity of the loops before performing any lifting. Nets must not be dragged on the ground, as this can damage them. Fish farmer must check that pests such as mice and rats have not been in contact with nets during storage.
Installation
5.1 Checking documentation - checklist items prior to installation
Before you start using a net, you must ensure that all documentation (product certificate, service history card, user manual) is included and corresponds with the identification number on the net. Check that the net complies with the requirements for the waves current applicable to the site and that it has the correct mesh size. Check the packaging for any damage. Visible damage to the packaging is a sign that something has happened to the net during transport or storage.

Egersund Net recommends that you someone with experience of these types of operations in charge of the installation. Installing a net can be a risky operation, and the person in charge must ensure that all other personnel follow the guidelines and procedures that you have developed for installing nets, and that they use the necessary safety equipment. Nets must never be installed or handled when weather and current conditions pose a risk of injury to personnel or damage to equipment.
5.2 Lifting
You must use an approved lifting strap to lift the net into place. If the net is packed in a bag, then you must check that loops on the bag are approved for lifting. During all lifting operations, the net must be handled carefully and in a controlled manner.
5.3 Additional equipment required for the installation of nets
Nets can weigh a great deal. We, therefore, recommend that you use one or more boats with sufficient crane capacity when installing the net. We also recommend using a pulley or winch to pull the net into place. Thers are high-risk operations and and you must have reliable procedures in place for this type of work in order to avoid crush injuries.
Any extra ropes that are attached to the net or other equipment used for the installation must be removed after use. This is to prevent loose rope ends from being left floating in the sea and posing a risk of tearing or weakening the net if they get tangled up in a boat or similar.
5.4 Installation in a pen
The procedure for installing a net in a pen can vary, depending on size, access to equipment and personnel, as well as the fish farmer`s procedures and experience.
Nets are usually packed with the botoom of the net at the bottom and the top of the net at the top.
- Make sure that the top of the net is attached/secured before placing the net.
- Lift the bottom section out first. Attach the centre bottom to a boat or pen, as this will secure the net while you install it into the pen. This will also make it easier to attach a centre weight, if needed.
- Then lift the rest of the net overboard until only the top part of the net remains.
- Attach the first attachment loop. If you are using a sinkertube or other stretching system that must be anchored to the pen, you must ensure that the first attachment point is next to a lifting rope. The attachment loop on the lifting rope must be installed in a point on the pen that has been prepared for attaching to the net and stretching system.
- Attach the attachment loops to the pen as the boat pulls the net across the pen. Make sure the top loops and the attachment loops are installed correctly in relation to each other. Continue until you have reached approximately halfway around the circumference of the pen. The net has now formed a double layer.
- Attach the rope straps to the top loops that need to be installed on the opposite side of the pen. Make sure the right loop is positioned in the right place, so that they are placed correctly when you pull them across.
- Then pull the rest of the net across to the opposite side and attach the remaining attachment loops.
- TIP: Use a buoy: Consider attaching a buoy to the top of the net before you drag it across to the opposite side of the pen. This will prevent the net from sinking.
-
Check that all the attachment loops are in use and installed correctly. The attachment loop must not be raised to the point where the knot is rubbing against the pen. This can weaken and potentially sever the loop. See section 6.1
- Then install the stretching system.
5.5 Check after installation
A net must be checked after installation, even if the net is new or has come directly from service. Egersund Net recommends that you perform a visual inspection after installing a net with a stretching system in the pen to identify any damage or faults that may have arisen during the installation.
- Check that all attachment loops have been properly installed
- Check that the stretching system is not in contact with the net
- Check that the jump net is not carrying the weight of the net
- Check that there are no holes in the netting
- The mooring system must be installed correctly and in such a manner that the net does not come into contact with it
Interfaces with additional equipment and other components
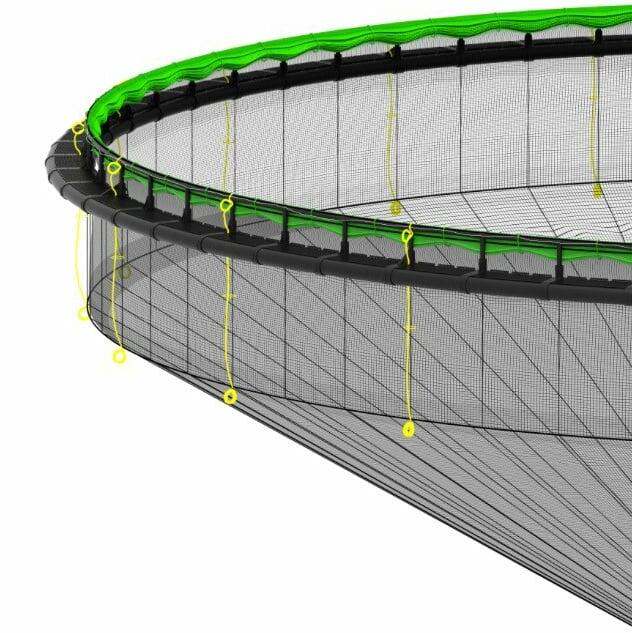
6.1 Attaching the net to the pen
You must use the correct type of net for the pen you plan to install it in. All nets have their own loops to be used for attaching. The number of loops varies, but the placement of the attachment point on the net must nevertheless correspond to the pen you are installing it in.
You must only use the loops on the main rope to attach the net to the pen. All loads applied to the net are transferred to the pen via the attachment loops. You must never use the loops on the top ropes to attach the net to the pen. They are only intended for lifting (applies to loops on lifting ropes) and attaching the jump net.
Ropes and occasionally straps are used to attach loops to the pen. A loop must be fitted to the pen in such a manner that it is not exposed to abrasion or wear and tear; it must not be installed too tightly against the frame of the net (see illustrations below).
We recommend attaching the attachment rope to the loop in the net before you attach it to the pen. This will make it easier to install the net. It is a good idea to splice an eye at one end of the attachment rope, which you can thread through the attachment loop. The recommended length of an attachment rope is 3-5 m, which allows you to thread the rope through the loop twice to create an even stronger fastening.
The dimensions of the attachment rope to be used depend on the size of the net.
For nets with a circumference of up to and including 100 m, we recommend using a rope of at least 16 mm. For nets with a circumference of more than 100 m, we recommend using a rope of at least 18 mm.
 Loop installed correctly
 Loop installed correctly
 Loop installed incorrectly
 Loop installed incorrectly
6.2 Installation and handling of stretching system
If you use a stretching system, you need to ensure that it will not damage the net or other important equipment. A stretching system must only be attached to the net at a point degigned for that purpose. The weight of the stretching system must not under any circumstances expose the net to any load that exeeds the capasity of the loops being used. The maximum permitted load at the attachment point for the stretching system is specified in the net`s product certificate.
6.2.1. Sinkertube or single weights in bottom loops
When using a sinkertube or single weights in bottom loops, you must only use loops that are designed for lifting for the stretching system. These loops are attached to the bottom rope where the side ropes continue as cross ropes at the bottom. The maximum permitted load at the attachment point for the stretching system is specified in the net`s product certificate.
We recommend placing the sinkertube under the bottom rope of the net, about 45 degrees. This will provide better weighting. Adjust the length of the attachment rope to the distance between the bottom loops on the net and sinkertube. See user manual for pen for more information about installing a net to sinkertube.
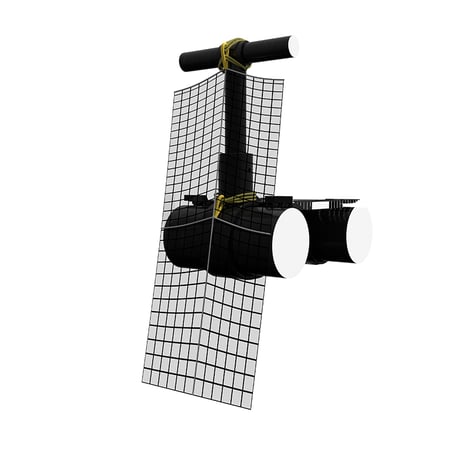
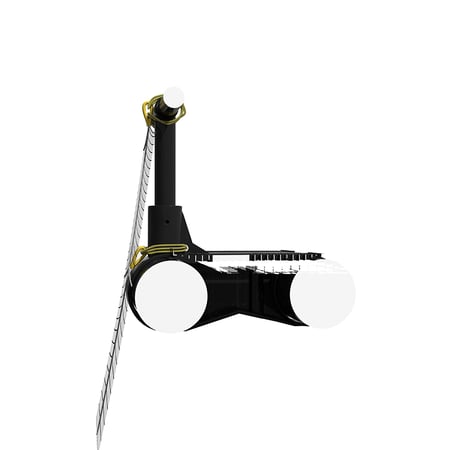
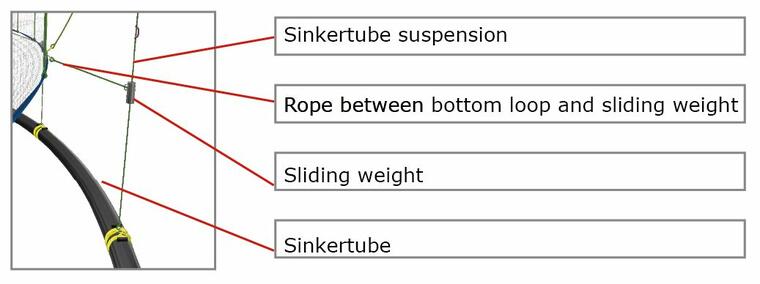
6.2.2 Attaching sliding weights
When sliding weights are used as stretching system in a net, a weight hanging in the sinkertube suspension is attached. Bottom loop is attached to the sliding weight, and this weight moves along the sinkertube suspension. If there is a waist rope on a net, a sliding weight can be attached there as well. Loop on waist rope is then attached to siding weight in sinkertube suspension.
6.2.3 Centre weight
The weight must be lowered slowly with a dedicated rope, until its weight is transferred to the net. You do this after the net has been securely installed in the pen. The weight depends on the size of the net, current conditions etc. The maximum permitted load at the attachment point for the stretching system is specified in the net's product certificate. Remember to ensure that the weight does not come into contact with moorings under the sea.
It is a good idea to attach a thin rope at the very top where the sinker rope is fitted to the pen.
This acts as a safety precaution in the event that the sinker rope in the middle of the net moves and the weight gets stuck behind the ropes attached to the pen. A thin rope will move when subjected to the load of a weight, which will prevent an uneven load on the pen.

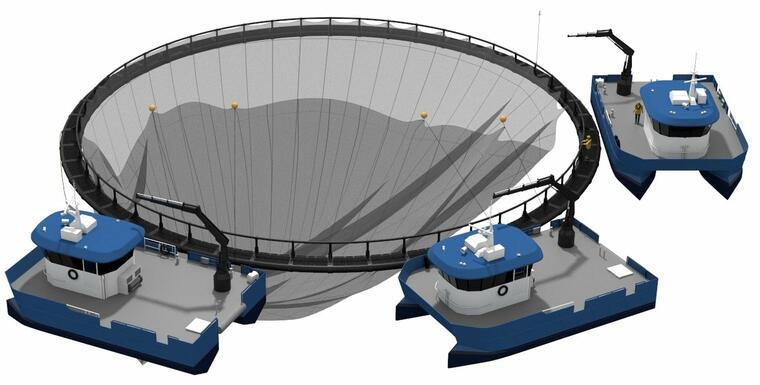
6.3 Installation and handling of dead fish collection system
A dead fish collector, Liftup or other system for collecting dead fish should make it easier to remove dead fish from a net. Dead fish are to be removed regularly. This is done for various reasons, including to prevent other fish/predators from biting at the dead fish from outside the net, which may weaken the netting ond damage the net.
Equipment used for dead fish collection must sit at the centre bottom of the net, where the netting is reinforced. The dead fish collection system should be inspected when conducting routine inspections. Is a dead fish collector rope inside/outside the net is used, the rope attached to the weight under the net must be long enough to ensure that the weight does not come into contact with the net. This reduces the load on the net when the dead fish collector is pulled up. Any dead fish collector rope used must be suitable for the net and comply with the recommendations from the net manufacturer. Refer to the user manual for dead fish collectors for more information.
6.4 Additional equipment
You must be sure to properly secure any additional equipment installed in the pen or net in such manner that it cannot come into contact with the net. You must remove any equipment that is not in use.
Examples of additional equipment include dead fish collector, Liftup, feeding tube, camera, top net and cleaner fish hide.
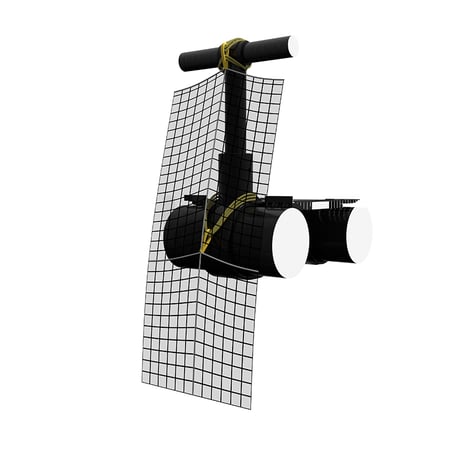
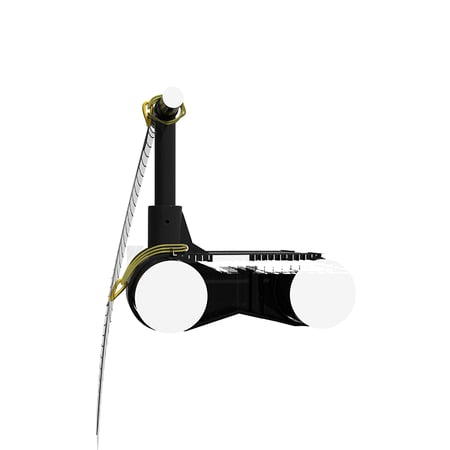
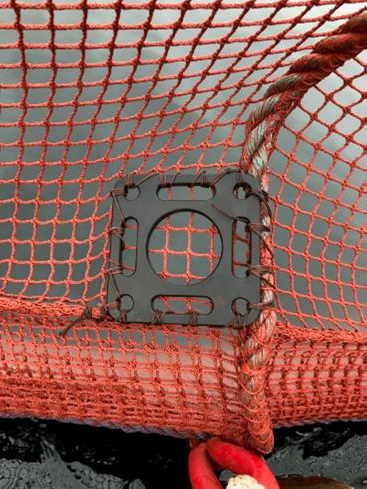
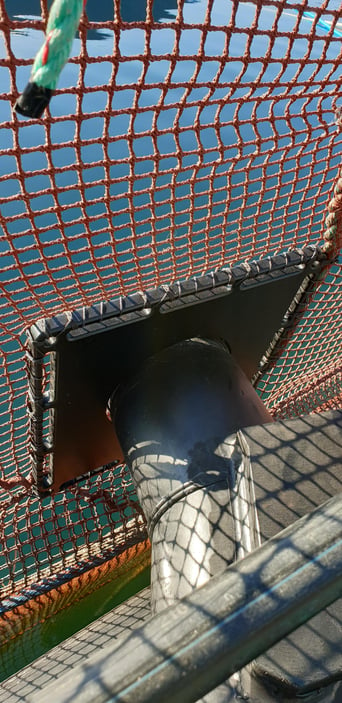
6.4.1 Passing components through the netting
We recommend installing the feeding tube between the jump net and the railing of the pen, by tying a rope around the railing and feeding tube. It is a good idea to leave some slack in the rope so that the tube hangs a slight distance from the railing - this will reduce the risk of wear and tear on the tube. You may also want to use several ropes to secure it.
Conduct regular checks to ensure that the tube does not come into contact with the railing or the jump net on the net.
There may be times when components (e.g. a tube for the dead fish collection system) need to be fed through the netting. Before this can happen, the netting needs to be secured by installing a panel in the jump net on the net. This is made of PE or PA 6. The hole on the panel must be made to fit the component that is to be fed through the netting. The panel is fitted in the jump net on the net, above the water line. It is woven into the side ropes, to make sure it stays in the correct position. After attaching it, cut a hole through the middle of the panel. The hole should be made as small as possible. Make sure there is enough slack in the jump net where the panel is placed to avoid stress on the netting. If you need to pass a feeding tube or tube for dead fish collection system through the netting, it must be attached to the frame/walkway with a rope as an added safety precaution.
You will need to make a checklist for the panel and include this in your routine inspections of the installation. The panel and system for passing components through the netting must also be inspected after unforeseen circumstances such as extreme weather or strong current.
Check that the panel is intact and not coming under strain or damage.
Check that the component passed through the netting is not coming under strain.
For any questions about installation, please contact Egersund Net.
Operation
7.1 Approach by boat
When approaching by boat, you must ensure that you approach from the correct side in relation to the direction of the current, so the boat soes not come into contact with the net. Please be aware that the direction of the current can change while performing an operation.
Loading and releasing of fish must be done in a manner that prevents any damage to the net. You and the person steering the boat must care to prevent any equipment being used from coming into contact with and potentially damaging the net. The same applies when performing other tasks, such as delousing.
7.2 Cleaning nets at sea
Cleaning nets at sea must be done with care to avoid damaging them.
Avoid using cleaning equipment in any manner that could cause damage to the net. The net must be inspected after cleaning, and this must be recorded in a log.
To bring out the best practice related to cleaning nets at sea, it is imoprtant that fish farmer, supplier of net, antifouling and cleaning services have a good dialog. Fish farmer must carry out risk assessment to find the best solutions related to cleaning nets, to take care of the net`s service life and to prevent damage to the net.
When cleaning nets at sea, it is recommended that the water pressure does not exceed 100 bar.
7.3 Handling the net when performing operations
Correct handling of the net is essential to maintaining its service life. There are many operations that are performed regularly, and they can be performed in various ways depending on the type of installation, available equipment, types of operations etc. Procedures and routines suitable for each specific operation should be put in place.
Examples of such operations include:
- Placing a net
- Changing a net
- Delousing or other form of treatment performed on the fish
- Using a bead line/ball line
- Harvesting fish
You must follow the following general guidelines to reduce the risk of damage when handling the net:
- Check weather and current conditions
- Be familiar with the net`s design before embarking on the task
- Ensure you have sufficient personnel and equipment to ensure responsible handling of the net
- Remove any loads from the stretching system before lifting
- Never lift the net by the netting
- Only use a lifting rope to lift the net, or a handling rope attached next to a lifting rope
7.4 Use of bead line/ball line
Bead lines/ball lines are used to reduce the volume of a net, primarily for the purpose of harvesting, sorting or treating fish.
Bead lines/ball lines usually comprise multiple floats strung onto a rope. The bead line/ball line is dragged under the net until the volume has been sufficiently reduced.
Before carrying out the operation, the designated person responsible must ensure that all other participants follow the relevant guidelines and procedures prepared by the fish farmer. The bead line/ball line must be inspected before use, and any old rope ends must be removed.
If any balls or floats are found to be damaged, these must first be removed.
Any loads from weights must be removed from the net before commencing the operation.
Additional equipment such as power cords or cleaner fish hides must be secured or removed.
The operation must be monitored when the bead line/ball line is in use. You must exercise extreme caution and fully minimize the risk of damage to the net, while also focusing on the welfare of the fish and HSE. Drag the bead line/ball line as carefully as possible and monitor that it does not get caught in the netting.
For more information about this equipment, please see the user manual for bead line/ball line.
7.5 Change a net
You may need to change a net while it contains fish. This is primarily achieved by inserting the net net under the old one, or by stitching it to the existing net before dragging it into place in the pen.
Changing a net is a risky operation, and the designated person responsible must ensure that all other participants follow the relevant guidelines and procedures for changing a net prepared by the fish farmer, and must make sure that the necessary safety equipment is used. The net must not be handled/changed during weather and/or current conditions that involve a risk of injuring personnel or damaging equipment. Before changing the net, any extra equipment found in and around the net must be secured to prevent it from damaging the net. You must also remove the dead fish collection system and weights before performing the operation.
7.6 Remove net from pen
When a net has been emptied of fish, you can remove it from the pen. You can then deliver it to a service facility for recertification, or for disposal in the event that it does not meet the requirements pursuant to NS 9415.
Before removing the net from the pen, you must ensure that all fish have been taken out and any dead fish have been removed. If you need to cut a hole in the bottom of the net to remove any remains of dead fish, we recommend that you do not cut up to a cross rope.
We also recommend making the hole as small as possible. This will reduce the time required for repair/recertification.
Any hooks that have been attached to the railing of the pen must be removed or covered for protection. This will prevent the net from getting caught in something and damaging it unnecessarily.
Check the direction of the current - the net should be pulled up against the current.
If the net has been extended using a sinkertube, it must be detached by lifting the sinkertube up to the surface or by sending a diver down to cut the net loose from the sinkertube.
NB: Make sure you cut the rope that is attached between the netting and the sinkertube - and NOT the bottom loop.
Start by taking hold of the loop on the bottom rope or at the centre bottom of the net.
Pull the net on board a small section at a time.
- You should only remove the net from the pen if the weather and current conditions permit
- Responsibility for such operations must be given to a person with relevant experience
- Make sure to use certified lifting equipment throughout the whole process
- Make sure to use the correct protective equipment in accordance with the site operator`s procedures
7.7 Special environmental conditions
7.7.1 Current conditions
You should carry out extra inspections of the net when there is a strong current. You must check that the net is sufficiently stretched and that the dead fish collection system is situated at the centre bottom.
7.7.2 Extreme weather
In the event of potential extreme weather, you must carry out checks on the attachment loops, ropes, netting, stretching system and dead fish collection system. This must also be done after a storm.
7.7.3 Ice in winter
Exposed sites may face challenges such as drifting ice in the winter, and ice and snow on the jump net. You must be aware of this and find solutions that prevent strain or damage to the net.
Here are a few tips if ice gets on the jump net:
- Attach the jump net to the railing on the pen (using a thin rope).
- Attach the ropes usually used for attaching the jump net in the normal way, but allow some extra slack.
- If the jump net is weighed down by ice, the thin rope will break and the jump net will slip into the sea. This will melt the ice. The slack rope will keep the jump net afloat, to the extent that there is no risk of it sinking too deep.
7.8 Risk assessment - critical points
The net is designed so that the ropes absorb all loads.
Nevertheless, there are still some critical factors that could cause damage to a net:
- External influences such as extreme weather or strong current conditions
- Contact between the net and the pen, which may lead to wear and tear
- Incorrect installation of attachment loop
- Barnacles and mussels
- Contact between the net and the moorings, stretching system or other additional equipment, which may lead to wear and tear
- Insufficient removal of dead fish, which may cause predators to make holes in the netting in an attempt to get to the dead fish
- Poor handling of the net that subjects it to increased or incorrect loads
- Significant fouling resulting from the net being in the sea for too long.
Educating personnel who handle the nets and are responsible for the day-to-day monitoring will in many cases minimise the risk of accidents involving fish escaping.
Maintenance
8.1 General information
Having your nets serviced is crucial for maintaining the best possible fish production. To ensure that your net has an optimal service life, it is important that it is checked regularly when it is at sea. You must establish procedures for monitoring the net while it is installed in a pen and holds fisk. The person in charge of monitoring the net must be familiar with the net and its size and shape, and have the requisite fish-farming experience to be able to identify any abnormal occurrences. All inspections and servicing must be logged.
The net itself does not usually have any parts that need to be serviced or replaced by the fish farmer. Fixed loops, reops and netting must only be changed by a certified service facility. Loose ropes, such as handling ropes, can be replaced by the fish farmer, provided they are properly attached at the intended points. Please contact one of Egersund Net`s service facilities if you are uncertain about what is permitted in terms of servicing and replacement of parts by the fish farmer.
8.2 Check list for routine inspections
Routine inspections are intended to identify any damage and weaknesses as early as possible. You must incorporate these checks into your standard operational procedures.
The following items must at minimum be checked weekly and registered in a log:
| CHECKLIST ITEM | INSPECTION |
|---|---|
| ATTACHMENT OF THE NET | Check that all attachment loops are correctly attached to the pen, and that there are no abrasions or fraying damage to the visible part of the attachment rope. Pay particular attention to any attachment ropes lying underneath the walkway, as these sections are especially susceptible to wear and tear. |
| TOP LOOP | Check that the loop is intact and does not appear to be under strain. Strain on the top loop can be a sign that the attachment loop has been attached incorrectly. |
| TOP ROPE, MAIN ROPE, SIDE ROPE (VISIBLE SECTION) | Check that the rope does not have any breakage, crushing damage or other signs of being exposed to abrasion. Check that there is no fraying and no holes in the netting near the ropes. |
| JUMP NET AND VISIBLE SECTION OF NETTING UNDER MAIN ROPE | Check that there are no holes or obvious fraying. Pay special attention to the area around the attachment points. Check that the jump net is correctly positioned against the railing and is not exposed to an abnormally heavy load. |
| STRETCHING SYSTEM | Check for abnormal conditions in any stretching system attached to the pen. If the ropes/chains for the stretching system are slack or missing, this may increase the load on the net. |
| ADDITIONAL EQUIPMENT | Check that all additional equipment installed in or around the net is attached in a manner that cannot damage the net. |
| OTHER TYPES OF FISH INSIDE THE NET | If you see other types of fish inside the net, this indicates that there may be a hole in the netting. If this occurs, you must commission a diver or use a camera/ROV to inspect the sides and bottom of the netting. |
8.3 Checklist for special inspections
Egersund Net recommends that you have the net visually inspected by a diver or with a camera or ROV at least once every three months, and that you incorporate this into your inspection procedures.
The net should be inspected underwater after installation, before adding adding fish. You should also inspect the net after replacing it, and when making changes to the stretching system, mooring ropes etc. The net must also be inspected after extreme weather or unforeseen events that may have damaged it, and after completing procedures such as delousing. If there is any suspicion that something may be wrong with the net or associated components, you must carry out an inspection.
| CHECK ITEM | INSPECTION | ||
|---|---|---|---|
| SIDE ROPE BOTTOM ROPE CROSS ROPE WAIST ROPE | Check that the ropes are not damaged or showing other signs of having been exposed to abrasion in critical places such as around the stretching system, dead fish collector and attachment points. | ||
| NETTING | Check that there are no holes or clear signs of abrasion, such as from the stretching system. Pay special attention to the areas around the attachment points and dead fish collector. If you observe any "clean" sections on a net that is otherwise covered in fouling, this could indicate that the net has come into contact with something. These areas must be closely inspected. | ||
| ATTACHMENT POINT FOR STRETCHING SYSTEM | Check that the netting surrounding the stretching system is intact. Check that the stretching system is positioned properly and correctly secured to the net. For sinkertubes, it is important to avoid any misalignment caused by different lengths of rope/chain between the pen and the sinkertube potentially overloading the net. | ||
| SINGLE WEIGHTS | Must hang so that they are below the net and not in direct contact with the netting. | ||
| CENTRE BOTTOM | Check that all components in the centre bottom are intact. |
8.4 Inspection of the net by a certified service facility
A new net must be inspected and checked by a certified service facility in accordance with the requirements set out in the NYTEK regulations and NS 9415, within 24 months of the net being put into use. If the net satisfies the standard minimum requirements for durability of new netting, the net can be approved and used for a further 24 months before the next inspection by a certified service facility. If the net`s durablity is found to satisfy at least 65% (60% for jump nets) of the requirements for new netting, the net can be approved and ued for up to 12 months before the next inspection by a certified service facility. A net found to have a durability rating below 65% of the requirements for new netting in the same dimension classification must be discarded.
In order for a net to be used for more than 24 months after it was put into sea as new, you must ensure that your net has a valid service history card confirming that the net still satisfies the requirements for use. Such a service history card can only be issued by a service facility for this type of inspection. All Egersund Net service facilities are certified for this type of work.
Nets in service are normally washed for 2 hours in a washing machine, og maximum 4 hours - depending on how dirty the net is.
Fish farmer must consider how dirty the net is before submission for service, and it is recommended cleaned before submission if it is very dirty.
Inspections carried out by a certified service facility include a full inspection and testing of the whole net. This includes visual inspections of the ropes, netting, loops etc. The netting must be inspected pursuant to the prevailing requirements of NS 9415. Any damaged or clearly weakened components must be replaced.
If you use another certified service facility, you can obtain information concerning installation methods and other details from one of Egersund Net`s service facilites.
8.5 Log
All inspections and maintenance of a net must be logged.
The log must at a minimum describe:
- The action completed (type of inspection, cleaning, maintenance or repair), with reference to a plan and procedure
- The result of the action taken
- The nescessary follow-up as a conclusion to the action taken
- Date
- Person/facility responsible
- Signature
8.6 Disposal/ recycling
A net that no longer meets the minimum durability requirements, or is in a condition that makes it advisable to no longer use it to contain fish, is to be discarded. The net is typically made of nylon, polyester and rope, which can usually be recycled. It is therefore important that you deliver the net to a certified service facility that has a return scheme. This will ensure that the net is handles in a appropriate and environmentally responsible manner.
Egersund Net`s service facilities have a scheme in place for the destruction and recycling of used nets, through a collaboration with Nofir. Nofir has established a return system for discarded fish-farm equipment. Discarded nets are delivered to Egersund Net service facilities, where they are washed, disinfected and packed before they are sent to be dismantled and recycled.
8.7 Temporary repairs to prevent escape of fish
If you discover any holes in the netting, you must initiate temporary repair work immediately. In the event of holes in the netting, you must make sure to use thread with sufficient strength. If you do not have thread available, you can use cable ties. Temporary repairs are not considered repairs under the provisions of Section 32 of the Nytek Regulations, which is why the work must be assessed by personnel with documented competence. Personnel from Egersund Net facilities can assist with this assessment, in addition to providing advice and guidance if needed.
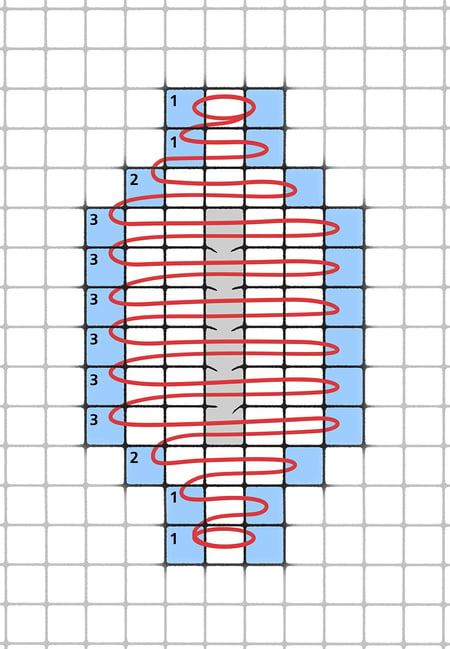
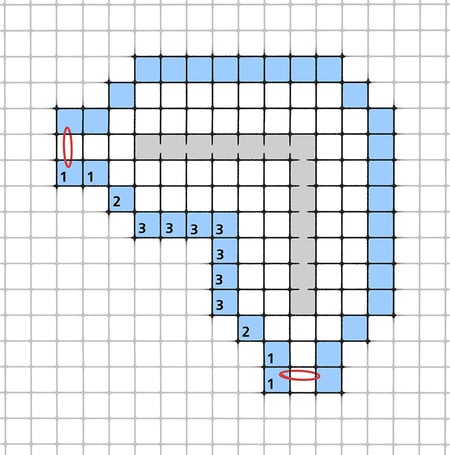
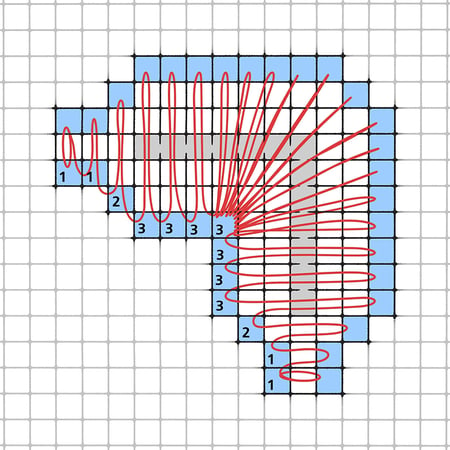
Prinsiple for completing temporary repais, using thread:
- Start 3 rows above the hole and make a double flag stitch to secure the knot.
- When you are going to sew up a hole, it is important to stitch far enough into the netting (marked 1,2,3) to avoid tearing.
- Make a double half hitch that is as tight as possible, i.e. a maximum fistance of 10 cm.
- Finish sewing up the hole with a double flag stitch.
- Go back 2 rows and make a double half hitch to secure the knot.
- If you use cable ties for temporary repair, see point 2 over.
Prinsiple for completing temporary repairs:
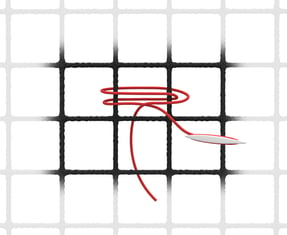
Double flag stitch